
ICT tips
Best Practice NetworkICT tips
Section 1 - Accessing the forms
- Open your browser, this will probably be Internet Explorer or Firefox. Go to https://www.hlta.org.uk. The HLTA candidate forms can be downloaded from this internet site in Microsoft Word (top selection) or Microsoft Works (bottom selection) format by clicking on each task and when the window pops up select Save. If it opens automatically when you click on it, you can either go to File – Save As or go back to the previous page, right click on the link to the document and press Save As.
- You now have your own spell-checkable blank forms. Find a place on your computer (or a floppy disk/CD/data stick) where you can easily relocate and edit the forms when you need to.
- Open the forms with either Microsoft Word or Microsoft Works, depending on the version you have downloaded. Please note that these forms are not suitable for use with Wordpad or Notepad and if these are the only word processing applications you have available on your computer, we suggest you consider downloading the free office package, OpenOffice, or trying the fully functional evaluation version of Sun’s StarOffice (links to these are available on our website), or look at the latest editions of computer magazines in your local newsagent as these programmes are often given away on their cover CDs.
- Always work on your forms on the hard drive – if you use a floppy disk or a ‘data stick’, make sure you also save the updated version onto your hard drive.
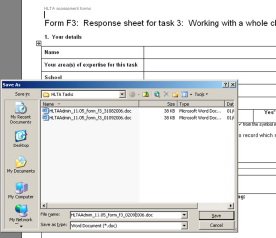
- Save your work as your name, HLTA form name, then the date (e.g. Annie_Example_ formF3_9.11.07). This means that the next time you open the file to continue working on it, if you first select File – Save As – your name, HLTA task and that day’s date, you will always have your previous version of the forms available.
- Some people email themselves their updated versions when closing down their computer – that way if your computer crashes you will be able to retrieve your work from another computer.
Section 2 - Using the forms
If you find that the table is set too far over to the right you can go to – File – Page Setup – and reduce the left hand margin so that the template sits on your page better. You can now begin adding information by typing in the tables. HCG1 Tel: 0117 920 9200 Email: [email protected] Fax: 0117 929 7163 Document: HLTA Candidate Guidance – ICT Tips Current as of: June 2013 Approved by: DB Page 2 of 2 Some parts of the form are marked in blue, as they are for assessor use only. The easiest way to insert a list of documents is to type each reference number, document description and standard in the relevant columns and then press return to take you to the next available line, adding information across the page as you go.
Section 3 - The candidate assessment grid- form F9
Inputting text and symbols onto the assessment grid is quite simple. To tick the boxes to indicate which tasks support which standard:
- Double click on the correct box
- Select ‘Checked’ under default value • Click ‘OK’
- There should now be a cross in the box
- You can do this for every box that needs ticking
Section 4 - Submitting your forms
You have been provided with a separate handout to explain how you should submit your tasks and assessment grid. Your RPA will require you to send these documents to the assessor by email. If you don’t have your own personal email address there are many free web-based email systems available. Try www.hotmail.com or www.yahoo.co.uk
You can use any email address to email your tasks, but it if it is not an address that contains your name, please add your own name as the subject of any emails you send to the RPA, your tutor or your assessor.
To attach a document:
- Make sure the document is not open on your computer.
- Write the message to your chosen recipient as normal.
- Each email account will have either a paperclip icon or you can select the Insert File option, or Attach – you will then be able to browse through your files until you find the final version of your tasks.
- Double click on the file and on the screen you will see, by way of an icon in the attachment, or a notification page, that your document has been attached to the email.
- Send as usual
- Copy it to yourself (‘cc’) if you want to check that the email has been sent with the attachment.